
Recipes
Eggless Black Forest Cake Recipe: Bakery-Style and Alcohol-Free
Jul
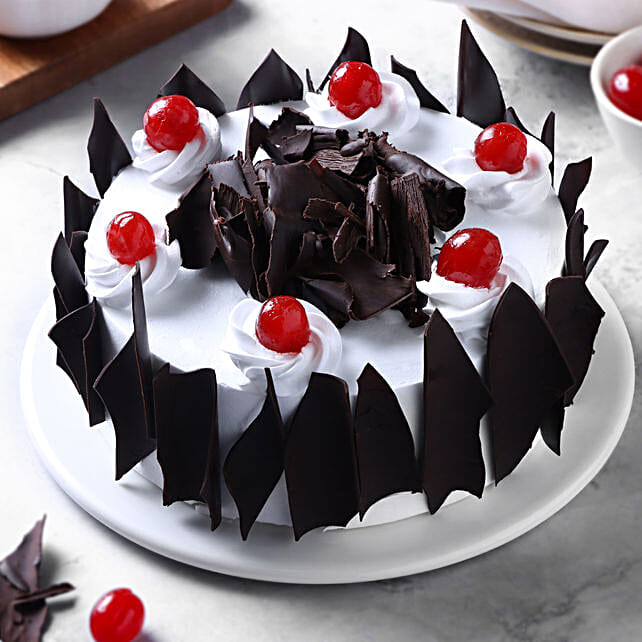
A good Black Forest cake should not taste like an ordinary chocolate cake hidden under a thick layer of sugary cream. Each slice should have a light cocoa sponge, juicy cherries, soft whipped cream and delicate chocolate shavings. The cherry syrup should keep the layers moist without making them wet or heavy.
This eggless Black Forest cake recipe is designed for a home kitchen. It makes one 8-inch, two-layer cake and includes measurements in both grams and cups. You can bake it in an oven or a heavy kadai, and the finished cake contains no eggs or alcohol.
The method is detailed because most problems with Black Forest cake happen after baking. Warm sponge, runny cream, watery cherries or too much syrup can make the layers slide. Follow the cooling and chilling times instead of rushing the assembly.
Black Forest Cake Recipe at a Glance
| Detail | Information |
|---|---|
| Preparation time | 45 minutes |
| Baking time | 30–35 minutes |
| Cooling and chilling | About 2 hours |
| Total time | About 3 hours 20 minutes |
| Cake size | One 8-inch cake |
| Servings | 8–10 slices |
| Recipe type | Eggless and alcohol-free |
| Difficulty | Intermediate |
What Makes a Cake “Black Forest”?
Black Forest cake is based on the German dessert Schwarzwälder Kirschtorte. Its recognisable combination is chocolate sponge, cherries, whipped cream and chocolate. The traditional German version usually contains kirsch, a clear cherry spirit.
This homemade version replaces kirsch with cherry syrup, making it alcohol-free and suitable for family celebrations. It is still different from a regular chocolate cream cake because cherries are used both between the layers and in the soaking syrup.
Why This Eggless Recipe Works
- Oil keeps the sponge soft: Butter can become firm when refrigerated, while a neutral oil helps the cake remain tender after chilling.
- Milk and vinegar provide lift: Their acidity works with baking soda to give the eggless sponge a lighter crumb.
- The sweetness is controlled: The sponge is moderately sweet because the cream, cherries and chocolate add sweetness later.
- The cherry syrup has two jobs: It adds flavour and protects the sponge from drying in the refrigerator.
- Chilling is built into the method: A cold sponge is easier to cut, and a chilled crumb coat keeps the finished layers stable.
Ingredients
For the eggless chocolate sponge
- 1½ cups (180 g) all-purpose flour or maida
- ⅓ cup (35 g) unsweetened cocoa powder
- ¾ cup plus 2 tablespoons (180 g) caster sugar
- 1 teaspoon baking soda
- ½ teaspoon baking powder
- ¼ teaspoon fine salt
- 1 cup (240 ml) milk, at room temperature
- 1 tablespoon (15 ml) white vinegar or apple cider vinegar
- ⅓ cup (80 ml) neutral oil, such as sunflower or rice bran oil
- 2 teaspoons vanilla extract
- 1 teaspoon instant coffee dissolved in 1 tablespoon hot water, optional
For the cherries and soaking syrup
- 250 g pitted cherries, fresh, frozen or canned
- ½ cup (120 ml) water or reserved liquid from canned cherries
- 3 tablespoons (35–40 g) sugar, or less if the canned liquid is already sweet
- 1 teaspoon lemon juice
For the whipped cream
- 2 cups (500 ml) chilled dairy whipping cream with at least 35% fat, or chilled non-dairy whipping cream
- ⅓ cup (40 g) icing sugar, only if using unsweetened dairy cream
- 1 teaspoon vanilla extract
- 2 tablespoons milk powder, optional but useful for stabilising dairy cream
For decorating
- 75–100 g dark or semi-sweet chocolate
- 8–10 whole cherries
Ingredient Notes Before You Begin
Choose the right cherries
Sour cherries give the closest balance to the traditional cake, but they are not always easy to find in India. Canned or frozen cherries are more dependable throughout the year. Drain canned cherries well and taste the liquid before adding sugar. Glacé cherries are very sweet and are better kept for decoration rather than used as the main filling.
If you use fresh sweet cherries, lemon juice is important because it gives the filling some of the tartness that balances the cream.
Use unsweetened cocoa
Natural unsweetened cocoa or Dutch-process cocoa can be used. Drinking chocolate is not a direct substitute because it contains sugar and often has much less cocoa. Sift the cocoa with the flour to remove dry lumps.
Check the cream label
Regular table cream or low-fat fresh cream will not reliably hold a layered cake. For dairy cream, look for at least 35% fat. Non-dairy whipping cream is usually easier to handle in hot weather and stays firm for longer, but it is often pre-sweetened. Taste it before adding any sugar.
Measure flour without packing it
For the most consistent result, use a kitchen scale. If using cups, loosen the flour, spoon it into the cup and level the top. Scooping directly from the packet can pack in too much flour and make the sponge dry.
Equipment
- One 8-inch round cake tin at least 2 inches deep
- Parchment paper
- Two mixing bowls
- Fine sieve
- Hand whisk
- Electric beater
- Wire cooling rack
- Long serrated knife or cake leveller
- Offset spatula or broad butter knife
- Pastry brush or spoon
- Cake board or flat serving plate
How to Make Eggless Black Forest Cake
Step 1: Prepare the pan and oven
Grease the base and sides of an 8-inch round tin. Line the base with parchment paper. Preheat the oven to 170°C for 15 minutes. If using a fan-assisted oven, use 160°C.
Keep the oven rack in the middle. Do not place the cake too close to the upper heating element because the top may set before the centre is baked.
Step 2: Make quick buttermilk
Combine the room-temperature milk and vinegar. Leave the mixture for 5 minutes. It may look slightly curdled; that is expected.
Add the oil and vanilla. If using coffee, dissolve it completely in one tablespoon of hot water and add it now. Coffee deepens the cocoa flavour but should not make the cake taste like coffee.
Step 3: Mix the dry ingredients
Sift the flour, cocoa powder, baking soda, baking powder and salt into a large bowl. Add the caster sugar and whisk until evenly distributed. Break up any remaining sugar or cocoa lumps.
Step 4: Make the batter
Pour the wet mixture into the dry ingredients. Whisk gently only until no dry flour remains. Scrape the base and sides of the bowl with a spatula.
The batter should be smooth and pourable. Do not beat it for several minutes. Once the liquid meets the flour, excessive mixing develops gluten and can make an eggless cake rubbery.
Pour the batter into the prepared tin and tap the tin lightly on the counter two or three times to release large air pockets.
Step 5: Bake the sponge
Bake at 170°C for 30–35 minutes. Avoid opening the oven during the first 25 minutes. The cake is ready when:
- the centre springs back after a light touch;
- a skewer inserted in the middle comes out clean or with a few dry crumbs; and
- the edges have just started to pull away from the tin.
Leave the cake in the tin for 10 minutes, then run a thin knife around the edge and turn it onto a wire rack. Remove the parchment and cool completely.
Once cool, wrap the sponge and refrigerate it for 30–45 minutes. A slightly chilled cake produces cleaner layers and fewer crumbs.
How to Bake Black Forest Cake Without an Oven
Use a heavy, deep kadai with a tight-fitting lid and a metal trivet. The cake tin must sit on the trivet rather than touch the base of the kadai.
- Place the trivet inside the empty kadai. Do not add water, and there is no need to add salt.
- Cover and preheat on low heat for 10 minutes.
- Place the filled cake tin on the trivet and close the lid immediately.
- Cook on the lowest flame for 35–45 minutes.
- Do not lift the lid during the first 30 minutes. Start checking with a skewer after 35 minutes.
The exact time depends on the weight of the kadai and the strength of the burner. Use a kadai you are comfortable heating while empty; a pressure cooker is not necessary.
Prepare the Cherry Filling and Syrup
Set aside 8–10 whole cherries for decoration. Roughly chop the remaining cherries.
If using fresh or frozen cherries
Add the water, sugar and lemon juice to a small saucepan. Bring to a gentle simmer. Add the chopped cherries and cook for 3–4 minutes, just until they soften slightly.
Strain the mixture. Keep the cherries and liquid in separate bowls and allow both to cool completely. The liquid is your soaking syrup.
If using canned cherries
Drain the cherries and reserve ½ cup of their liquid. Taste it before adding sugar. Simmer the liquid with lemon juice for 2 minutes, adding only enough sugar to balance any tartness. Cool completely. The drained cherries do not usually need cooking.
Do not put warm syrup or warm fruit on whipped cream.
Make Stable Whipped Cream
Chill the mixing bowl and beaters for 15–20 minutes. The cream should remain refrigerated until you are ready to whip it.
Pour the cold cream into the chilled bowl. Beat on low speed for about 30 seconds, then increase to medium. When the cream begins to thicken and forms soft peaks, add the sifted icing sugar, vanilla and optional milk powder.
Continue beating at medium speed until medium-stiff peaks form. The cream should hold its shape, but the surface should still look smooth. Stop immediately; overwhipped cream becomes grainy and can turn into butter.
If using sweetened non-dairy whipping cream, normally only vanilla is required. Follow the sweetness instructions on its pack rather than automatically adding icing sugar.
In hot weather, assemble the cake in the coolest room available. Return the bowl of cream to the refrigerator whenever you pause.
Assemble and Decorate the Cake
1. Divide the sponge
Use a serrated knife to remove any domed top. Slice the chilled sponge horizontally into two even layers. Turn the cut side upward so it can absorb the syrup.
2. Soak the first layer
Place the first layer on a cake board or serving plate. Brush or spoon 2–3 tablespoons of cold cherry syrup over it. Cover the surface evenly, including the edges, but do not flood it.
3. Add cream and cherries
Spread a layer of whipped cream about 1 cm thick. Make a slightly raised ring of cream around the edge; this acts as a barrier. Scatter half of the drained chopped cherries inside the ring.
Wet fruit makes layers slide, so drain the cherries before adding them.
4. Add the second layer
Place the second sponge layer on top, cut side upward. Brush it with another 2–3 tablespoons of syrup. Press very lightly to level it; do not compress the cake.
5. Apply a crumb coat
Spread a thin layer of cream over the top and sides. This traps loose crumbs. Refrigerate the cake for 20–30 minutes.
6. Finish the frosting
Cover the chilled cake with the remaining cream. The surface does not need to be perfectly smooth because chocolate shavings will hide small imperfections.
7. Add chocolate and cherries
Run a vegetable peeler along the side of a room-temperature chocolate bar to make curls, or use the broad side of a grater for smaller shavings. Press the chocolate gently onto the sides and scatter some over the top.
Pipe or spoon small cream swirls around the edge and place one whole cherry on each. Refrigerate the finished cake for at least 45 minutes before slicing.
For neat portions, dip a sharp knife in warm water, wipe it dry and cut one slice. Clean and warm the knife again before the next cut.
Seven Tips for a Better Black Forest Cake
- Cool every component: The sponge, syrup and cherries must be cold before they touch the cream.
- Do not reduce the oil: The cake is refrigerated after assembly, and oil helps the sponge stay soft when cold.
- Use syrup with restraint: A little syrup keeps the crumb moist; too much makes the lower layer collapse.
- Drain the cherries: Visible liquid around the fruit is a warning that the filling may slide.
- Whip only to medium-stiff peaks: Very soft cream cannot support the layers, while overwhipped cream looks grainy.
- Chill between coats: The crumb-coat break is part of the structure, not just a decorating step.
- Balance the sweetness: Tart cherries and dark chocolate keep the finished cake from becoming cloying.
Common Problems and How to Fix Them
| Problem | Likely cause | What to do next time |
|---|---|---|
| Cake is dense or rubbery | Batter was overmixed or too much flour was measured | Weigh the flour and mix only until combined |
| Cake sank in the centre | Oven was opened early, cake was underbaked or raising agents were overmeasured | Keep the door closed for 25 minutes and measure level teaspoons |
| Sponge feels dry | Too much flour or excess baking time | Check 5 minutes earlier and brush each layer evenly with syrup |
| Cream will not thicken | Cream has too little fat or became warm | Use cream with at least 35% fat and chill the bowl, beaters and cream |
| Cream looks grainy | It was overwhipped | Stop at medium-stiff peaks; if only slightly grainy, gently fold in 1–2 tablespoons of cold cream |
| Layers are sliding | Cherries were wet, too much syrup was used or the cream was too soft | Drain fruit, reduce syrup and chill the crumb-coated cake |
| Chocolate will not form curls | Chocolate is too cold and brittle | Leave it at room temperature briefly before shaving |
Make-Ahead Plan
Black Forest cake is easier when the work is divided.
One day before serving: Bake and cool the sponge. Wrap it tightly and refrigerate it. Prepare the cherry syrup and filling, cool them and refrigerate them in separate covered containers.
On the day of serving: Whip the cream, assemble the layers and decorate the cake. Chill it for at least 45 minutes before cutting.
Do not assemble the cake several days in advance. The cream can lose freshness, and the sponge gradually absorbs moisture from the fruit.
Storage
Keep the cake covered in the refrigerator because it contains whipped cream. For the best flavour and texture, finish it within 2–3 days. Return leftover slices to the refrigerator promptly, especially in warm weather.
The unfrosted sponge can be wrapped well and frozen for up to one month. Thaw it overnight in the refrigerator before slicing and assembling. Freezing the fully decorated cake is not ideal because the cream and cherries may release water while thawing.
Useful Variations
Vegan Black Forest cake
Replace dairy milk with unsweetened soy or oat milk. Use plant-based whipping cream and check that the chocolate is dairy-free. The remaining method stays the same.
Less-sweet version
Use unsweetened dairy whipping cream, dark chocolate and tart cherries. Do not cut the sponge sugar below 160 g, because sugar also affects moisture and structure.
Three-layer cake
For three layers, divide the batter between three 6-inch tins and begin checking after 18–20 minutes. You will need slightly more whipped cream for filling and decorating. Avoid cutting a shallow 8-inch sponge into three fragile layers.
Fresh cherry version
Use ripe but firm cherries. Pit them, cook them briefly in the syrup and drain well. Soft, overripe fruit can release too much juice into the cream.
Frequently Asked Questions
Can I use atta instead of maida?
You can replace up to half of the maida with fine whole-wheat flour, but the cake will be denser and taste more wheaty. A full replacement is not recommended if you want a light, bakery-style sponge.
Can I use Amul Fresh Cream?
Fresh cream with about 25% fat is difficult to whip firmly enough for a tall layered cake. Use dairy whipping cream containing at least 35% fat or a non-dairy whipping cream intended for cake decoration.
Can I skip the coffee?
Yes. Coffee only makes the cocoa taste deeper; it is not required for the cake to rise or set.
Can I replace vinegar with lemon juice?
Yes, use the same amount. White vinegar is more neutral, while lemon juice may leave a very mild citrus note.
Why is my eggless cake sticky on top?
A little surface stickiness can come from moisture and sugar. Cool the cake on a wire rack and do not wrap it while warm. The sticky top can be trimmed before layering.
Is Black Forest cake always eggless?
No. Traditional and modern recipes may contain eggs. This particular recipe uses milk, vinegar, baking soda and baking powder to create an eggless sponge.
Does Black Forest cake contain alcohol?
Traditional German versions use kirsch, but many Indian bakery versions do not. This recipe is completely alcohol-free and uses cherry syrup for flavour and moisture.
Can I make it without cherries?
Cherries are a defining part of Black Forest cake. If fresh cherries are unavailable, use canned or frozen ones. Replacing them with another fruit produces a chocolate fruit-and-cream cake rather than the classic flavour.
Homemade or Ready-Made?
Make this recipe when you have enough time for cooling and chilling; those pauses are what keep the layers neat. If you need a professionally finished cake for a birthday or a last-minute celebration, you can instead browse options for black forest cake in Delhi.
Whether homemade or bakery-made, the balance matters more than excessive decoration: soft chocolate sponge, noticeable cherry flavour, lightly sweetened cream and enough chocolate to add texture without overpowering the fruit.
